- HubPages»
- Technology»
- Computers & Software»
- Computer Software
How to Convert Your PowerPoint Presentation into a Video, Using Windows Movie Maker

It would be so pleasant and easy to make and use videos, if an existing PowerPoint presentation could just magically be uploaded into the HubPages video capsule or into YouTube. Of course, you could use Authorstream or Camstudio; or you could invest in Camtasia Studio. (You could, not I.)
But, aside from those options, it is possible to transform your PowerPoint presentation into a video, with some imagination, creativity, determination, and Windows Movie Maker software (which was included with Windows XP, Windows 2007, and Windows Vista).
In a nutshell, the process includes these steps:
Ø Create the PowerPoint slides, including the desired background - (effects, animations, and audio can be added later)
Ø In PowerPoint, save the slides as JPG files (best save them to just one folder)
Ø Import those slides into Windows Movie Maker Collections
Ø Import any audio you wish to add
Ø Move the slides onto the storyboard or timeline and set the duration for each slide
Ø Add any desired effects to slides and transitions between the slides
Ø Add the audio, editing it as needed
Ø Add titles, if you wish
Ø Follow the directions in Windows Movie Maker for saving as a movie
Voila – a video that can be uploaded to HubPages, YouTube, Vimeo, or another video-sharing site!
Picture Created from a PowerPoint Slide

Starting Out in PowerPoint
In PowerPoint, create a slide or series of slides to your own specifications.
As a sample, I imported a portion of Sunflowers by Van Gogh that I found and added a background that was available in PowerPoint. I did not take the time to check on other color options for the background other than the ones I saw initially. The one I selected seemed to me to be the best of the choices; I did manage to change the angle of the stripes in the background.
Then in PowerPoint, select Save As – Other Formats – jpg. You can do this from the drop-down menu; or just right-click on the screen and select Save as Picture. If you have created several different slides, you can save them all at the same time, but only if you operate from the drop-down menu. You are not offered that option when you right-click to save the picture.
Once you have created your pictures (and perhaps your background music or some video clips – whatever will go into the creation of your video), open up Windows Movie Maker. On the File menu, you have the option to “Import Into Collections” and when you choose that, you can import the various elements you wish to use.
Moving Between Several Computers
The Windows Movie Maker project that you create is actually a collection of links to these elements, which are still stored on some drive of the computer. That means that if you try to move a project to a different computer for whatever the reason, you will likely lose the elements that you thought were making up your project. How do I know this? I’ve been there, done that.
This means that you need to work on your project on just one computer until you have completed it and are ready to convert it into a movie. Or, the alternative is to save all the elements (the clips – video clips, audio clips, photos, etc.) on a flash drive which you can use on both of the computers you use – as long as the drive has the same letter name on both computers! (It’s probably easier just to work on only one for the entire project.)
One Collection In Windows Movie Maker
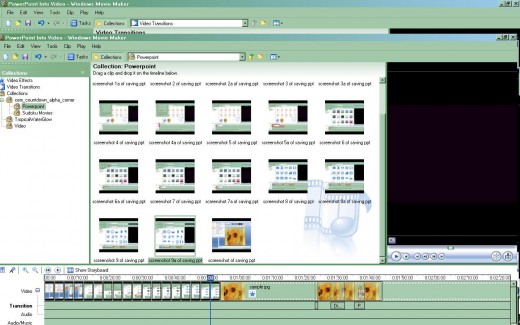
Dragging Clips, Altering Durations, Adding Effects
In Windows Movie Maker, you drag clips from “Collections” and drop them onto the timeline (or the storyboard, which works similarly but with slight differences). These elements can be altered; specifically, at this point, you can choose how long the picture will appear on the screen. The default duration is one second; this can be changed by going to Tools > Options > Advanced.
In addition, each slide on the timeline can be altered individually. So, for instance, I have changed many slides to a duration of three seconds; those that I feel need a little more time to view and process may be four or five seconds. The really long slides are 10-30 seconds, depending on what they actually show.
Each slide can also be altered by adding “Effects.” There are, for the most part, the same as the effects in PowerPoint, but perhaps with some slight variations. The effect will change what the picture actually does during the seconds that it appears on the screen. Effects are added by selecting Video Effects under Collections; then a specific effect should be selected/highlighted, and drag-dropped onto the appropriate slide on the timeline. If you don’t like the effect you have chosen, just right-click and click on Video Effects, then follow the instructions to remove it without removing the slide.
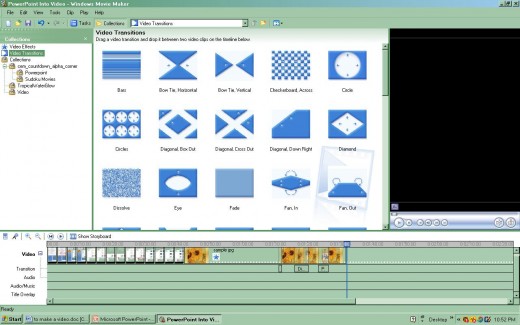
Transitions, Additions, and Previews
But wait, there’s more! Just as in PowerPoint, there are different ways to transition from one slide to another. Select Video Transitions, and look at all of the options! You can view a sample, to see the effect of a particular transition, if you right-click on a selected transition and then click Play Clip.
Among the possible transitions are Dissolve, Fade, Circle, Bars, Fan In or Out, Zig-Zag, Whirlwind, and many more. The default time for a transition is 1.25 seconds. If you wish for it to last longer, you can change the default time (as with the slides themselves) from the Tools menu, or drag the left side of the transition symbol on the timeline of the project. That will cause the transition to begin sooner, at an earlier point on the first of the two slides; and so you may find it necessary to lengthen the duration of that first slide to compensate and allow sufficient viewing time.
On the timeline, slides can just be selected and drag-dropped to a new location. New slides can be inserted earlier in the sequence, causing the ones already on the timeline to shift over to make room (but retaining all of their characteristics: duration, effects, transitions).
On the right-hand side of the working screen, Windows Movie Maker shows a demo screen where you can watch your work in progress and determine whether your selections are functioning as you wish. It’s super-easy to rewind to the beginning of the timeline – or just to click on a midpoint – and view your movie from that point on. (Technically, it is not a movie yet, but it’s getting there.) There is an option for viewing the project at the full-screen size. That’s fun! But you should note that, at that size, the pictures will appear fuzzy and not very sharp – now. That will not be the case when the project is saved as a movie.
Some of the Available Transitions
Music and Titles --- and Adjusting Effects
If you find that a particular effect seems to be operating too fast, it’s simple to change: just lengthen the duration of the slide where the effect has been applied. For example, in my demonstration video above, the “Hue, Cycles Entire Color Spectrum” effect moved so quickly – originally – that it left me gasping. I selected the slide on the timeline and changed its time from 1 second – first to 3 seconds, then to 30.
Music can be added to Collections and then drag-dropped onto the timeline. It can be trimmed to fit the presentation. But, interestingly, it is not actually cut! The beginning and/or the end of the audio clip can be altered (again by highlighting and dragging), but the portion that is “trimmed” so-to-speak is actually just “hidden.” It can be retrieved, or un-hidden, by dragging the appropriate edge of the clip. In one video that I made, I wanted to splice together two different parts of one piece of music. I dragged the clip onto the timeline and adjusted it for the first portion; then dragged it onto the timeline again and adjusted it for the second portion. Worked like a charm! Fade-in and/or fade-out can be added to the audio clip, if you wish.
You can add titles to the project: opening titles and credits; explanatory or descriptive screens throughout the video; end credits. These can be adjusted and personalized in many different ways: background color; typeface; font size; appearance of words (many variations, such as sweeping in, exploding in, typing in, etc.).
If you have already adjusted the music so that it was perfect, the titles may throw off your timing; it may be wise to add the music after you have the titles in place. But that’s an individual decision. I personally found that it did not create a huge problem to me to add the music before the titles and then adjust it.
Wrapping It All Up
The end credits can appear in several different manners; think “movie credits” to envision some possibilities. If you find that the credits are moving along (in whatever style) much faster than you wish, simply lengthen the duration of that slide; doing so will alter the speed of scrolling, flying, fading, exploding, or whatever.
All of these explanations have discussed the use of the timeline. The storyboard can be used instead, and you can even just alternate between the two formats. Some tasks are easier with one format than the other, but then there’s also a lot of variation in user preference, isn’t there?
When your movie project (saved as an MSWMM file) is just the way you want it, go to the File Menu and select Save Movie File. You will be given a few options during the process: location for saving; quality; etc. The time it takes to save will depend on your computer’s speed, of course; this short movie took about four minutes to save.
Now that you know how to change a PowerPoint presentation into a video with Windows Movie Maker, you may see some other movies that you can make without even using PowerPoint at all. Many of the options that make PowerPoint so user-friendly are similar in Windows Movie Maker. There is something of a learning curve, of course; but then, that’s true with pretty much every new skill, isn’t it? If not, then the skill is probably not all that new or useful.
In addition to the video that I created specifically for this article, I made similar videos as demonstrations of solving sample Hard and Expert level sudoku puzzles. I used exactly the same method, starting out in PowerPoint, converting slides to JPG files, and then using them to create a movie with Windows Movie Maker.
I hope this has been helpful. I welcome comments, questions, suggestions, and even complaints!