How to Insert Special Music Diagrams Into Manuscripts

Several other articles that I have written have given detailed instructions for inserting or including music and musical symbols in manuscripts or documents that are primarily made up of text. Most of the information is valid for music of all sorts and for teachers or musicians on many different instruments.
Fretted instruments have some unique ways of expressing information, including Tablature, chord frames, chord charts, and scale boxes. Here, I will include some information that can be used specifically with fretted instruments. This information should be used side-by-side with that from other articles, so that previously published information need not be repeated here in full.
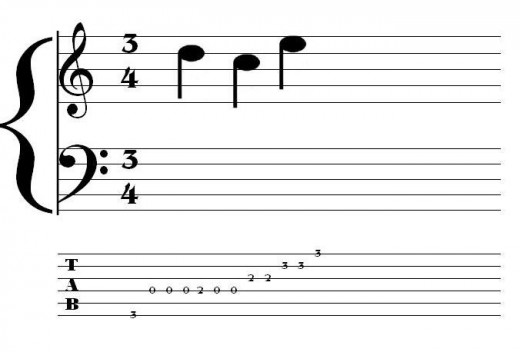
This sample of guitar tablature (below) is created just as a music staff would be, but with six lines instead of five. In this sample, the line spacing (Format> Paragraph>(Tab)/Indents and Spacing>Line Spacing) is set at Exactly 12 points. So that you can see incremental differences, I have also provided some samples that are more widely spaced, as captioned.
Music Samples Created in a Word Processing Program
Incremental Changes in Tab Spacing
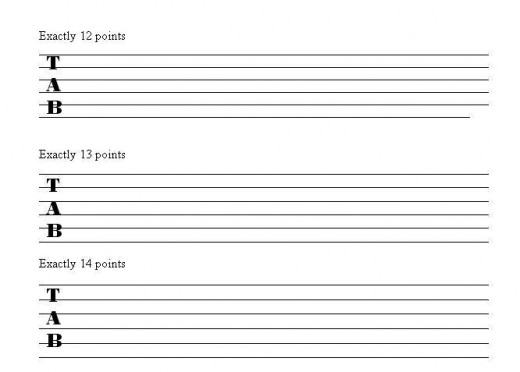
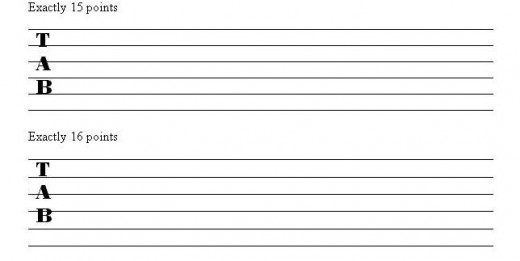
In these samples, the text box containing “TAB” (here set in PosterBodoniBT font at 18 pt) has not been changed with each change in line spacing. You can see how that alters its position on the Tablature lines. In your own creation of Tab on your computer, you would probably want to change the font size and/or the position of the text box to make it look better.
Just as notes and other symbols can be placed in text boxes and moved around on a staff (or inserted as pictures and placed either in front of or behind the staff), so can the numbers be that are used to indicate frets on Tablature. Notice this example.
Notes on Tablature
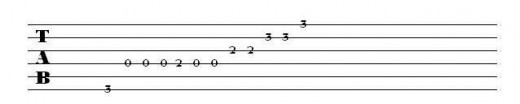
In this case, instead of using a separate text box for each note-number, which would indeed be viable, I used one large text box for all of the numbers and simply used vertical and horizontal spacing and changes of font size to make sure each number fit in the correct place. A much better option than either of these possibilities (12 little boxes or one huge one) would be to use a separate text box for each line of tablature, stretching the text box down the entire length of the line. If you do that, you could be assured that once you found the precise position for centering numbers over the line, the position would hold true for every number on that line. To make the text box itself disappear, select Format>Text Box>Layout>(Tab)/Colors and Lines> [no fill, no line]. It works best to get rid of the line, the border of the text box, only after the contents have been located precisely where you want them.
Tip: Create one file on your computer that consists of blank copies of tablature and other notation systems in the sizes and spacing that you like. You might even want to include some samples with numbers placed in the right spots on the lines. Then when you want to insert new Tab into a manuscript, you have the spacing already figured out, and you can simply copy and paste. Toggling the Insert key on the computer keyboard, you can type over the given numbers with the new ones, without having to go through the process of locating every item precisely once again.
Chord frames can be created by using the “Table” creator in your word-processing program. The frames below are both five columns wide (Exactly 0.25”/0.635 cm wide) and six rows tall (Exactly 0.35”/0.89 cm in height). The frame on the left denotes the nut by changing the thickness of the border. Here’s how: Select the table by clicking on the Table Move Handle (arrow-in-a-box) on the upper left corner of the table; after the black bars appear to show that it has been selected, follow these commands: Format>Borders and Shading>(Tab)/ Borders> Setting=Custom; Width=2 ¼ pts.; click on the line across the top of the Preview sample, or click on the button that shows the line across the top border of the table; be sure that you have selected “Table,” rather than any other option, in the “Apply to” selection box on the bottom right.
If you wish to designate where a specific fret is (right-hand sample below), you should know that you may need to adjust the vertical position of the Table itself to match the text, rather than vice versa. But the horizontal position of the text relative to the Table can be adjusted by using the spacebar or (perhaps more difficult) the computer keyboard’s Tab key.
Chord Frames
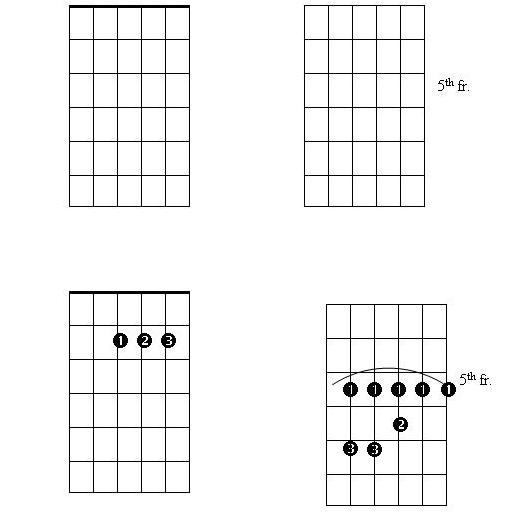
To apply fingering to the chord frame, use text boxes as described in How to Create Music Within Manuscripts (and also above). Circles with numbers already positioned inside can be located in the Symbols Dialogue Box (Wingdings, approximately row seven; or Wingdings 2, approximately rows 5-6) – either black on white or white on black. Insert the appropriate number circle into a text box, format the box so it can be positioned in front of the Table (chord frame) and move it around to the most precise position you can achieve before getting rid of the text box border. When all of the fingering circles have been placed, you might wish to Group them together so that they can be moved or resized as a unit. (See How to Create Music Within Manuscripts for details.) You can see samples above. (The arc is inserted as an AutoShape, then stretched and rotated to fit the spot where it is needed.)
Resized Chord Frames
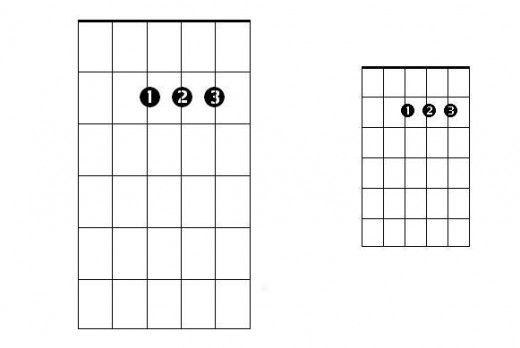
When you are placing the numbers (in text boxes) on the chord frame, you may find it easier to find the most precise position by using the spacebar inside the chord frame to move the number, rather than by moving the entire text box. If the box was not wide enough to start with, the number may disappear; all you need to do is to grab with the cursor one of the sizing circles on the side of the text box. Left-click and hold, pull the side in the direction you want, then release.
You may also find that you can achieve a greater degree of precision in locating the numbers, if you increase the size of the table and the numbers, place them, and then save them as a picture which can be enlarged or reduced as needed.
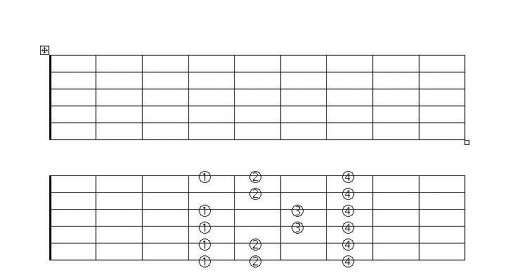
The scale box diagrams below are also made as Tables: five rows tall, each row Exactly 0.25" tall, and nine columns wide, each column Exactly 0.68" wide. This time the left edge or border is given a thicker line to denote the nut. Just as with the chord frames, fingering numbers can be placed to show patterns of fingers that are used for specific scale types, as shown below. They can also be Grouped if you wish, so that a cluster of numbers can be moved together.
Scale Box on Fingerboard Diagram
Charts for Woodwind Fingering
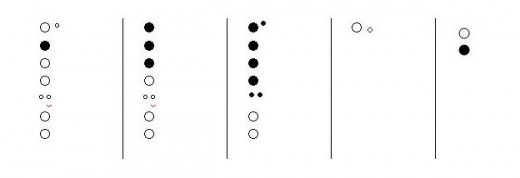
Fingering for Woodwinds can be shown by placing filled or unfilled circles (either from AutoShapes or from the Symbols selection) in appropriate positions relative to one another, generally in columns (or in a table if you prefer). AutoShapes work well if you need slightly large circles; once you create a circle of the size you need (or the smallest size you can achieve), create a filled and an unfilled version, then simply copy and paste each one as needed. If you need small-sized circles, you might prefer to use those available in the Symbol Dialogue Box. (The size of these can be changed by selecting the symbol in the manuscript and changing its font size, but that will also affect the line spacing unless you have hand-specified the line spacing.) The degree sign, found in nearly every if not in every font, can be used for double holes (two side-by-side of course) or for the thumb hole. Filled and unfilled circles of an appropriate size can be found in Wingdings 2, approximately in rows seven and eight. You may be able to access this from the font menu, without going through the Symbol Dialogue Box.
Interestingly, the degree sign lies in a different position relative to its neighbors than the Wingding filled circle does. Notice the layout below; in the first column, the empty circles are degree signs. In column three, the filled circles (resized to 22-point font size) are from Wingdings 2 (row eight.) In column four, the right-hand circle is not a degree sign, but instead is an unfilled circle from Wingdings 2, resized to a 6-point font size. In the last column, the two circles were made from AutoShapes that have been resized. Even though the result is good, AutoShapes can be difficult to control because they are floating objects. There are ways to work around their idiosyncrasies, but that can be discussed in a different conversation elsewhere or at another time.
If you want to create uniformity in the small circles, a good approach would probably be to use both filled and unfilled circles from Wingdings 2, both resized to an appropriate size for your context (6 points in my examples).
A shortcut tip, if you need to make several charts of fingering: Create a template of circles lined up in columns as shown below. (Visible lines between columns are optional.) On each line of the manuscript, supply both a filled and an unfilled circle of the appropriate size, and after the second circle, enter a space with the spacebar before you hit Enter. For double holes, you would end up with four little circles, two black and two white. That one template/pattern can then be copied and pasted wherever you need it, and the unneeded circles could simply be deleted. Using this procedure will save you some time and the frustration of having to insert lines and delete empty ones.
Woodwind Fingering Chart Samples
You may not yet have discovered the fact that a font may have a different size than the line where it is located. If you resize something – lettering, a symbol, or whatever – but leave the selected paragraph spacing without appropriate adjustment, a portion of the letters or symbols may not show up, as in the example below.
Crowded Text

Read more about making music
- Essential Jazz Guitar Chords For Beginners
Jazz can be an intimidating genre to learn, considering the vast numbers of scales and chords that jazz guitarists must have under their belts. That's not to say it's impossible - you just need to start off... - Simple guitar chords for beginners
When I started learning to play guitar, these where the chords I shunned almost instantly. Not because I thought I was superior or anything like that, but because I realized they where incomplete. The first... - Guitar scales and fretboard guide
I've tried to keep this as simple as possible. Memorise each diagram as you go for the best results. The headstock of the guitar is at the top, where the thick line is. Although musical notes follow the... - Learn Guitar Scales
If you're sick of learning guitar scales this is a simple step by step guide will tell you everything you need to get started. - The Most Difficult Instrument
This is an interesting question to be sure, and one I hope to answer by the end of this hub. In order to answer it, I will briefly go over each section of instruments, and a few instruments in each section,... - I want to play the bassoon! - All about Bassoons
The bassoon is a relatively rare musical instrument. The bassoon is part of the woodwind family of instruments, and is an astonishing feat of musical craftsmanship. It iakes skill to play the bassoon too, and buying a bassoon can be a daunting and co


